Related Articles
No related articles found!
How To Forward Emails To EasyDesk
Noah Parker
13 May, 2026
After verifying your domain successfully, the next step is forwarding your support emails to EasyDesk.
Email forwarding allows EasyDesk to receive incoming customer emails and automatically convert them into support tickets. Without forwarding, customer emails will continue arriving in your normal inbox instead of your EasyDesk workspace.
Before You Start
Make sure:
Your custom support email has already been verified
DNS verification status shows as Verified
You have access to your email provider’s forwarding settings
Examples of supported support emails:
Why Email Forwarding Is Important
Email forwarding connects your business inbox with EasyDesk.
Once forwarding is enabled:
Customer emails become support tickets automatically
Your team can reply directly from EasyDesk
Conversations stay organized in one workspace
Agents no longer need to manage emails manually from personal inboxes
Open The Forwarding Setup
To configure forwarding:
Go to Settings
Open Channels and select the channel for which you want to set up a custom email address.
Select the Ticket tab

Under Custom emails, find your verified/ Not verified or Forwarding pending email address

From that list, you will find the emails that have “Forwarding Pending” Status.
Click on the “Continue Setup” icon to setup your email forwarding

You can find it in the three dot menu as well.

EasyDesk will open the forwarding configuration window.
Step 1: Copy Your EasyDesk Forwarding Address
Inside the forwarding setup window, EasyDesk will generate a unique forwarding address.
Example:
admin@yourworkspace.easydesk.app
This address is where your support emails should be forwarded.
Copy the forwarding address carefully because you will need it in your email provider settings.

Step 2: Add The Forwarding Address In Your Email Provider
Now log in to the provider where your support email is hosted.
Examples:
Google Workspace
Gmail
Outlook
Microsoft 365
cPanel email hosting
Other email providers
Open your email forwarding settings and create a forwarding rule that forwards incoming emails to the EasyDesk forwarding address.
For example:
Google Workspace / Gmail
Follow these steps to forward support emails to your EasyDesk forwarding address.
Step 1: Open Gmail Settings
Sign in to your Google Workspace or Gmail account.
Click the Settings icon in the top-right corner.
Select See all settings.
Open the Forwarding and POP/IMAP tab.
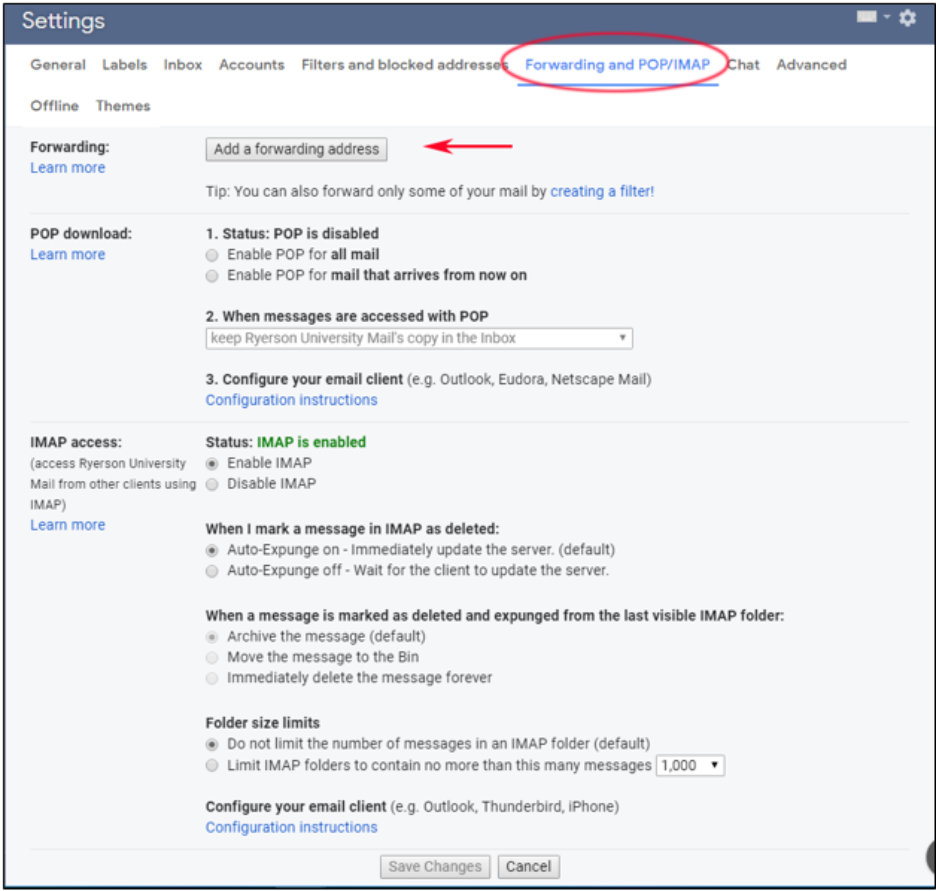
Step 2: Add The EasyDesk Forwarding Address
Click Add a forwarding address.
Enter your EasyDesk forwarding email address.
Click Next and confirm the address.
Google may send a verification email to the forwarding address.
Step 3: Enable Forwarding
Return to the Forwarding and POP/IMAP tab.
Select Forward a copy of incoming mail to.
Choose your EasyDesk forwarding address.
Click Save Changes.
Outlook / Microsoft 365
Use the following steps to forward incoming emails from Outlook or Microsoft 365.
Step 1: Open Outlook Settings
Sign in to Outlook or Microsoft 365.
Click the Settings icon.
Go to Mail → Forwarding.

Step 2: Enable Email Forwarding
Turn on Enable forwarding.
Enter your EasyDesk forwarding email address.
Optionally enable Keep a copy of forwarded messages.
Click Save.

cPanel Email Hosting
Use the cPanel Forwarders feature to redirect incoming emails to EasyDesk.
Step 1: Open The Forwarders Section
Sign in to your cPanel account.
Navigate to Email → Forwarders.
Click Add Forwarder.

Step 2: Create The Forwarding Rule
Enter the email address you want to forward.
Select your domain.
In the Forward to email address field, enter your EasyDesk forwarding address.
Click Add Forwarder.
Step 3: Test The Forwarding Setup
Send a test email to your support address.
Confirm that the email arrives inside EasyDesk.
If emails do not appear, verify the forwarding address and spam settings.
DNS Provider Help Resources
Every DNS provider has a different interface for managing email forwarder. If you are unsure how to do email forwarding with your current hosting provider, you can follow the official documentation from your domain provider below.
If your provider is not listed, contact your DNS provider’s support team for assistance with DNS configuration.
GoDaddy: Use Create Professional Email Forwarding for domains, or cPanel Forwarders for hosting.
Namecheap: Set up via Free Email Forwarding or Private Email Forwarding.
Network Solutions: Follow Email Forwarding via Webmail, accessing webmail.networksolutionsemail.com.
DNSMadeEasy: No native option; configure MX/TXT with ForwardEmail.net Guide.
Squarespace Domains: Limited to Domain Forwarding (URL); use third-party for email.
Hover: Enable through Email Forwarding with Hover Webmail.
Rackspace Cloud DNS: No native; see Rackspace Email Forwarding for their service.
Bluehost: Access Create Email Forwarders.
Cloudflare: Email Routing
Save Your Email Forwarding Settings
After adding the forwarding address:
Save the forwarding rule
Return to EasyDesk
Check the confirmation box: “I’ve added this email to my forwarding settings”

Click Send test email
EasyDesk will send a test email to confirm forwarding works correctly.
Confirm Successful Setup
If forwarding is configured correctly:
EasyDesk will successfully receive the test email as a ticket
Your support inbox connection will become active
Incoming customer emails will start appearing as tickets automatically
Once completed, click Go to inbox to open your EasyDesk inbox.

How Forwarded Emails Work In EasyDesk
After setup:
Every incoming customer email creates a ticket
Replies from agents are sent directly from EasyDesk
Email conversations remain synced automatically
Customers can continue replying normally from their inbox
Your team can now manage email support fully inside EasyDesk.
Common Forwarding Issues
Emails Are Not Appearing In EasyDesk
Possible reasons:
Forwarding rule was not saved
Wrong forwarding address was added
Email provider requires forwarding confirmation
DNS verification is incomplete
Test Email Failed
Wait a few minutes and try again.
Some email providers may take time to activate forwarding changes.
Forwarding Requires Confirmation
Some providers, such as Gmail or Google Workspace, may send a confirmation email before forwarding becomes active.
If required:
Open the confirmation email
Approve forwarding
Return to EasyDesk
Run the test again
Recommended Best Practices
For reliable email delivery:
Use a dedicated support email address
Avoid forwarding from personal inboxes
Complete DNS verification before forwarding
Test email delivery after setup
Keep SPF, DKIM, and DMARC records configured correctly
What Happens Next
After email forwarding is complete, EasyDesk will start receiving customer emails as tickets automatically.
Your support team can then:
Reply to customers
Assign conversations
Add automation workflows
Track response times
Manage all customer communication from one place
Was this information helpful?