Related Articles
No related articles found!
How To Verify Domain In Custom Email Address Setup
Noah Parker
11 May, 2026
Connecting your own support email address to EasyDesk helps you manage customer emails directly as support tickets. Before EasyDesk can send and receive emails securely from your domain, you must complete domain verification.
Domain verification protects your email reputation, improves deliverability, and helps prevent emails from being marked as spam.
Why Domain Verification Matters
Verification confirms that:
You own the domain
EasyDesk has permission to send emails on your behalf
Emails are trusted by receiving mail servers
This guide walks you through the entire setup process step by step.
Open Channel Settings
To begin:
Go to Settings
Click Channels and select the channel for which you want to set up a custom email address.
Open the Ticket tab

Inside this section, you will see:
Default EasyDesk email inbox
Custom email setup options
Add A Custom Support Email
Under the Custom emails section:
Click New email
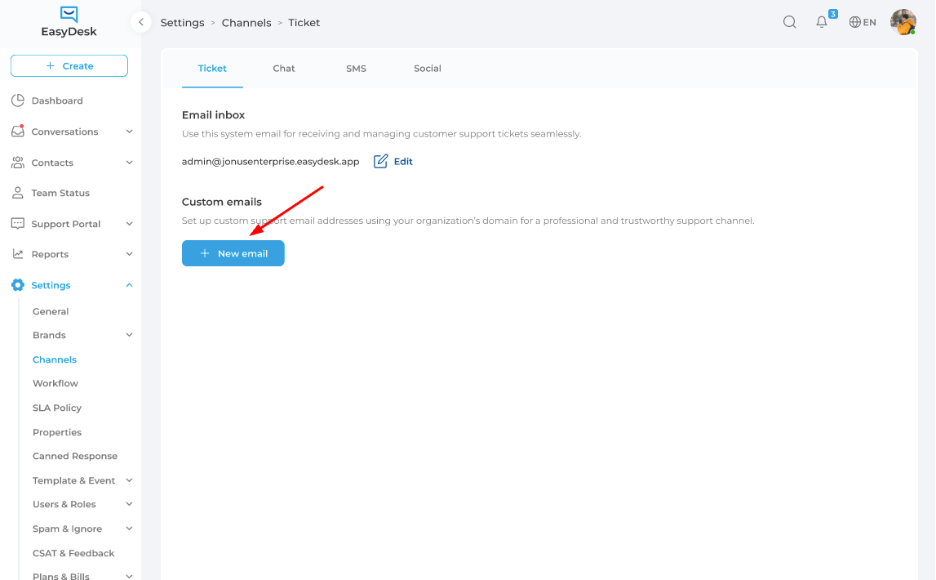
A popup window will appear asking for your support email address.
Example:
Enter the email address you want customers to contact.

Then click:
Continue
Understand Invalid Email Error
Sometimes EasyDesk may show an error like:
This email is associated with a user and can't be used for support.

This happens when the email address is already connected to an EasyDesk user account.
To fix this:
Use a dedicated support email address
Avoid using agent login emails
Create a separate mailbox for support communication
Good example:
Avoid:
john@yourdomain.com (if already used as a user account)
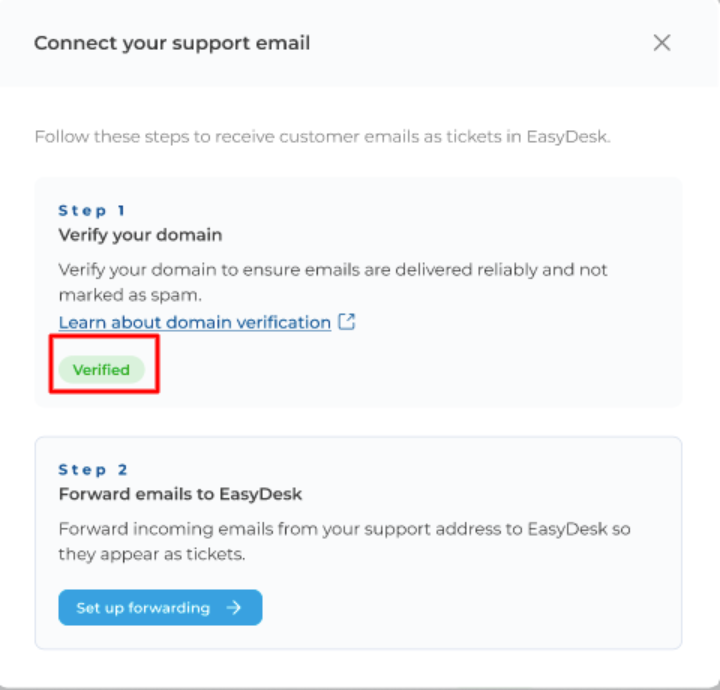
Start Domain Verification
After entering a valid support email address, EasyDesk opens the setup wizard.
The process contains two main steps:
Step 1: Verify your domain
Step 2: Forward emails to EasyDesk
Start with Step 1.
Click:
Verify

Add DNS Records To Your Domain Provider
EasyDesk generates several DNS records that must be added to your domain provider.
You will see:
Record type
Host value
Data value
Verification status

Open Your DNS Provider
Go to your domain hosting or DNS provider.
Common providers include:
Namecheap
GoDaddy
Cloudflare
Open the DNS management area for your domain.
For example, if your domain uses a cPanel-based hosting provider, it will look like this:

The same CNAME record at GoDaddy would look like this:

Then at Cloudflare your form would look like this:

Every DNS provider uses slightly different layouts, labels, and terminology when creating DNS records. Because of that, the steps and formatting for adding a CNAME record may vary depending on where your domain is managed.
DNS Provider Help Resources
Every DNS provider has a different interface for managing CNAME and DNS records. If you are unsure how to add the required records, you can follow the official documentation from your domain provider below.
If your provider is not listed, contact your DNS provider’s support team for assistance with DNS configuration.
GoDaddy: Domains Help: Add a CNAME record
Namecheap: How to Create a CNAME Record For Your Domain
Network Solutions: How Do I Manage DNS and Advanced DNS Records?
DNSMadeEasy: CNAME Record
Squarespace Domains: DNS Records for Web Hosting: CNAME
Hover: Managing DNS records
Rackspace Cloud DNS: Manage DNS records in the MyRackspace Portal
Bluehost: What Is A CNAME - How To Create & Edit CNAME
Cloudflare: Manage DNS records
Not Sure Who Your DNS Provider Is?
Your DNS provider is usually the company where:
You registered your domain name
Your website is hosted
Your domain’s DNS settings are managed
Common DNS providers include GoDaddy, Namecheap, Cloudflare, Bluehost, and Squarespace.
If you are unsure which provider manages your DNS records, you can use a DNS lookup tool to check publicly available domain information.
One simple option is:
Enter your domain name into the lookup tool. Near the bottom of the results page, you will usually see information about the provider managing your domain’s DNS records.
Once you identify your DNS provider, log in to that provider’s dashboard to add or update your DNS records for EasyDesk.
Create Required DNS Records
For every record shown in EasyDesk:
Copy the Host value
Copy the Data value
Create a new DNS record
Select the correct type (usually CNAME)
Paste the values exactly
Repeat this for all verification records.
Important:
Do not modify values
Avoid extra spaces
Keep record types correct
Even small errors can cause verification failure.
Understand Verification Status
Initially, every record usually shows:
Pending
This means EasyDesk is waiting for DNS propagation.
DNS updates may take:
A few minutes
Several hours
Up to 72 hours in rare cases
This delay depends on your DNS provider.
Check Domain Verification
After adding all DNS records:
Return to EasyDesk
Click Check verification

EasyDesk will automatically verify the DNS configuration.
Successful Verification
Once verification succeeds, the status changes to:
Verified
This confirms:
Your domain is authenticated
Emails can now be sent securely
Spam protection improves significantly
You can now continue the forwarding setup step.
Best Practices For Domain Verification
Use A Dedicated Support Address
Recommended examples:
Avoid personal inboxes.
Double-Check DNS Values
Most verification failures happen because of:
Incorrect hostnames
Missing records
Wrong record types
Typing mistakes
Always copy values exactly as shown.
Wait Before Retrying Verification
DNS propagation takes time.
If verification fails immediately:
Wait 15–30 minutes
Try again later
Avoid repeatedly editing DNS records unnecessarily.
Keep Verification Records Active
Do not delete DNS verification records after setup.
Removing them later may:
Break email authentication
Affect deliverability
Cause sending issues
Common Verification Problems
Records Still Pending
Possible reasons:
DNS propagation incomplete
Incorrect DNS values
Records added to wrong domain zone
Verify everything carefully.
Emails Go To Spam
Possible causes:
Verification incomplete
Missing DNS records
Authentication failure
Make sure all records show:
Verified
Verification Button Does Not Work
Possible reasons:
DNS changes not fully propagated
Browser cache issue
Invalid record formatting
Wait and retry after some time.
Summary
Domain verification in EasyDesk helps you:
Send secure support emails
Improve email delivery rates
Prevent spam issues
Authenticate your business domain
Build customer trust
After verification and forwarding setup, EasyDesk can fully manage customer emails as support tickets from your own branded email address.
Was this information helpful?